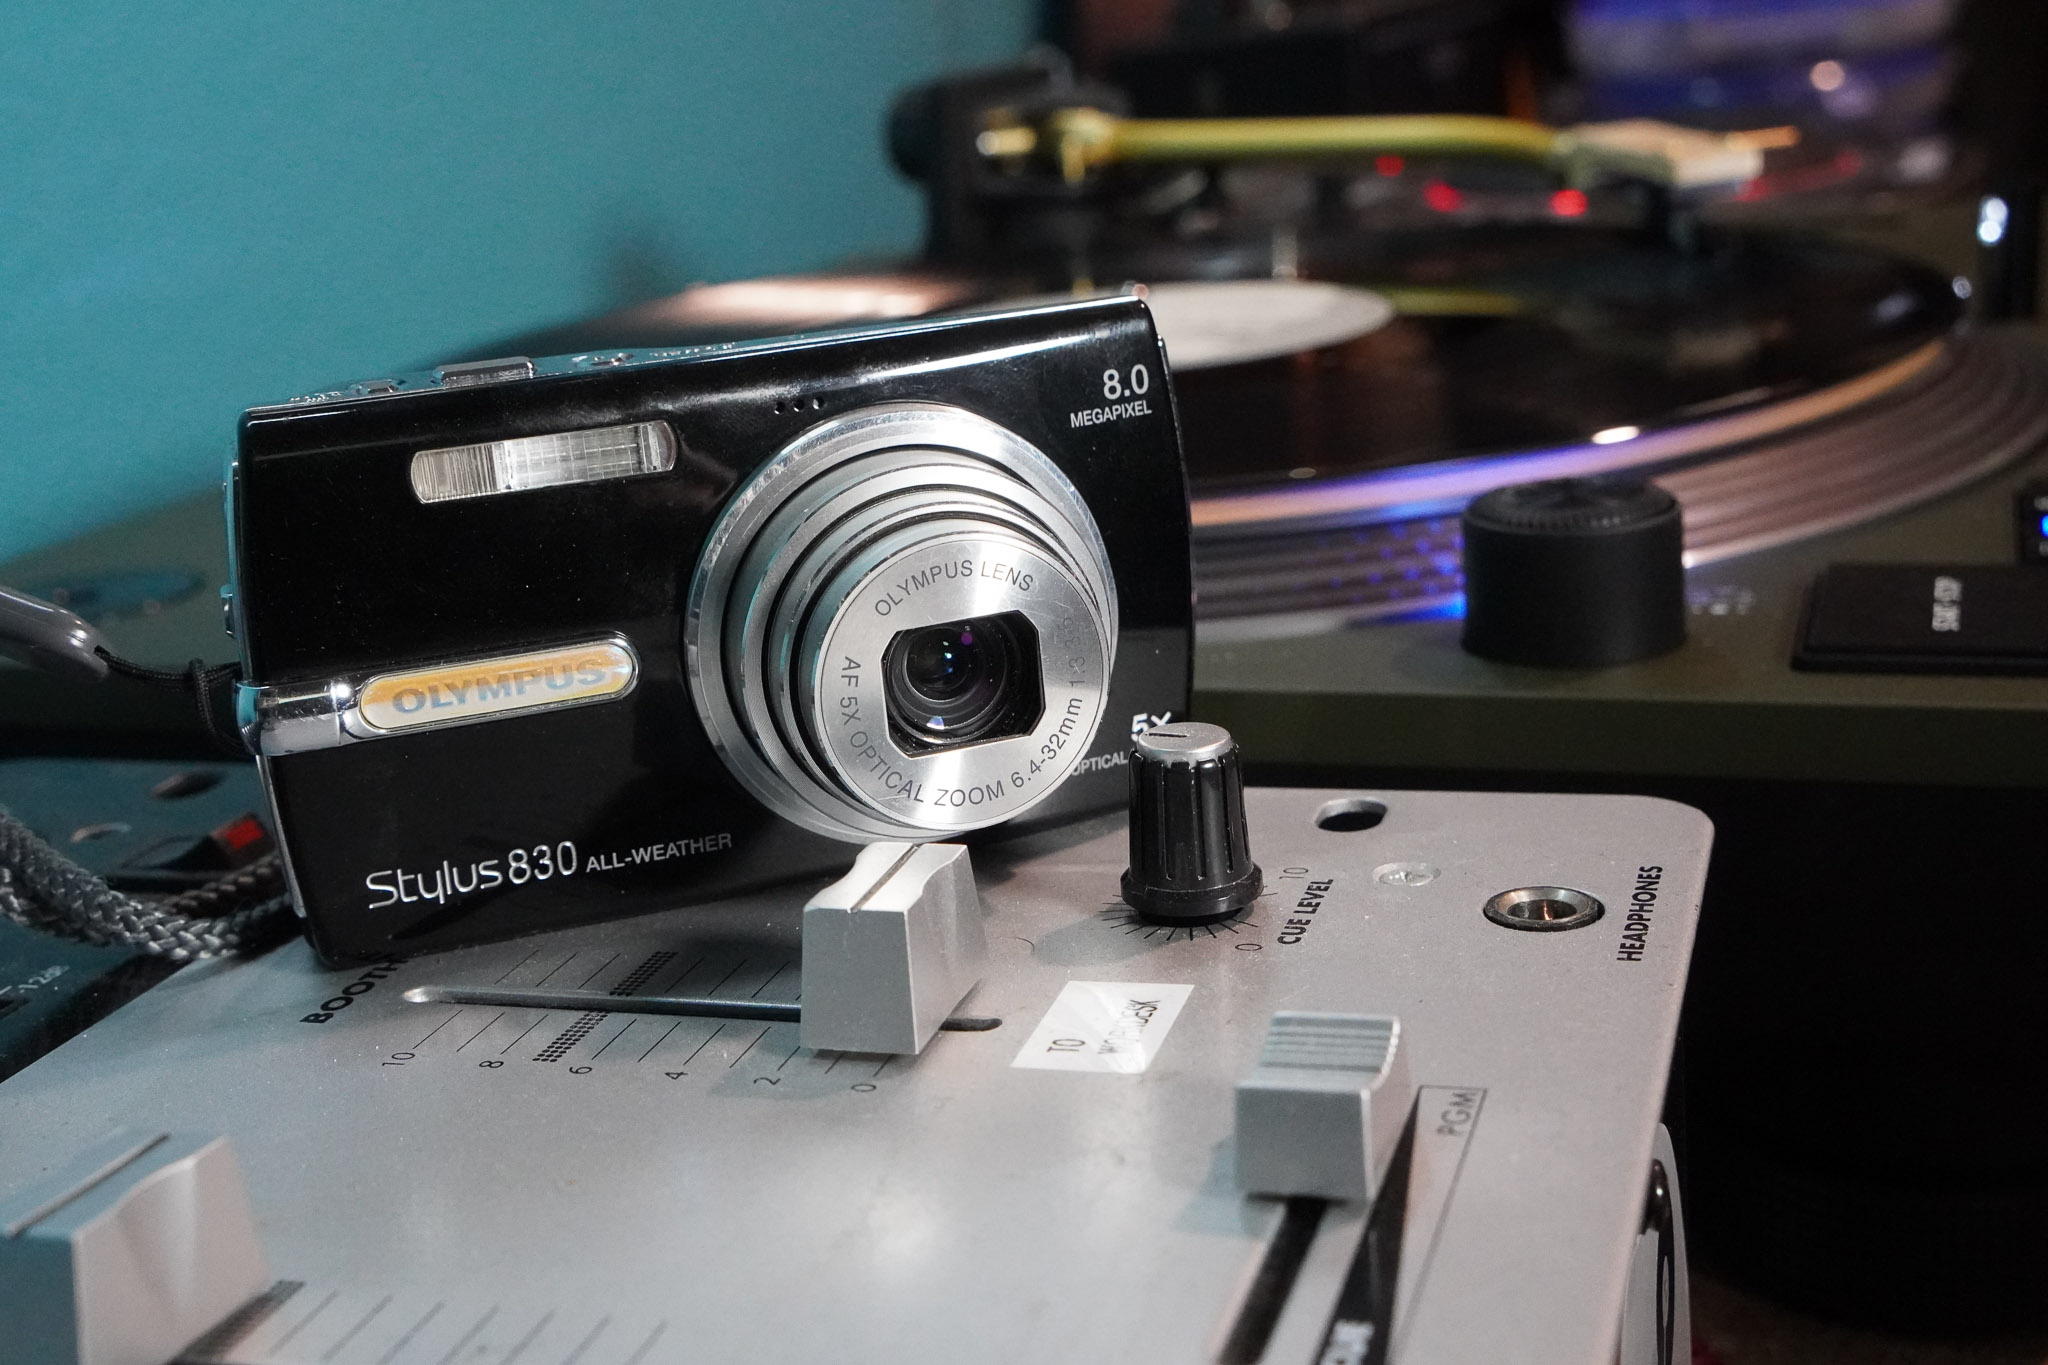
He agreed to do an email interview with me and so I sent along my questions. I hope to hear back from him soon so I can share his responses.
Sometimes I forget how blogging can help connect people with similar interests. Sure, I might have heard from Jason if I’d only tweeted about Network Awesome (and I did), or posted on facebook (yep, that too) or posted on a discussion forum (nope, didn’t do that). But a blog post still wields a bit more weight. First off, it’s less ephemeral than a tweet, which is mostly lost after a week or two. Furthermore, a blog is longer-form, so you can more fully develop an idea, with richer examples and links than 140 characters or a facebook status update permit.
Twenty years ago folks into retro TV shows might have been able to meet via zines, but it would certainly take longer, with correspondence happening over snail mail. With a blog someone can find you with a simple Google search. Or if you’re writing about someone else’s website, they might find you by checking their referral logs, which list all the sites that referred readers to a site.
In any event, this nice little happenstance further encourages me to keep up with my blogging resumption here at mediageek.
This is part two of my video series demonstrating how to use manual controls on Sanyo Xacti camcorders. I used the CG10 model, which I own, but this should work for the newer HD models, too, such as the CG21, CG20 and CG100.
In this video I show how you can assign a particular control to a direction on the control joystick. For instance, you can assign manual focus to the right positions of the joystick, so when you push it to the right you can access the focus controls. This is much more convenient than having to dig into the menus to change the focus.
Unfortunately, these adjustments are only available when you’re not shooting — you can’t change aperture, shutter, focus, ISO or exposure control while recording. In practice I haven’t found this to be a significant constraint, since I rarely am taking long shots. If I’m going to shoot something like a lecture or performance then I might either be able to set the focus and exposure for the whole the event, or I’ll use autoexposure so the camera can respond to changing lighting conditions, with minimal impact on the image quality.
This is a post I’ve been trying to get done for quite some time now. First I tried to write up instructions on how to use the manual focus, exposure, ISO and white balance controls available on the Sanyo Xacti VPC-CG10 camcorder. But it turned into quite a long, tedious experience that was difficult to finish. Then I decided that it would be better to simply make a video demonstrating how to use these controls. This endeavor because easier when I recently got my Sony NEX-5 camcorder which shoots HD video.
Part one of this video demonstrates how to find the manual controls for focus, exposure (aperture and shutter speed), ISO and white balance using the CG10′s menu. Part two of the video–coming shortly–demonstrates how to assign “shortcuts” for these controls so they can be more easily accessed without using the more cumbersome menu.
I can’t emphasize enough how being able to use these manual controls really sets the Xacti camcorders apart from most other inexpensive HD camcorders, especially the popular Flip and Kodak models. The newer Xacti models also have manual controls, so these instructions should work as well for the VPC-CG20, VPC-CG21 and VPC-CG100.
After hemming and hawing for about six months I finally took the plunge and bought a Sony NEX-5 interchangeable lens compact camera. As I wrote when the camera debuted, I was concerned about a few apparent drawbacks: a new lens mount and the lack of in-body image stabilization. You see, the reason I made the Sony a100 my first dSLR was entirely due to it being the only dSLR at the time–fall 2006–with in-body stabilization. It continues to be a feature I really like in my a100, even if now Pentax and Olympus have it, too.
Ultimately my concerns were minimized when I had a chance to actually have the NEX-5 in my hands and see just how small and pocketable it really is. Now, I had also been considering going with one of the competing micro-four-thirds (m4/3) cameras from Olympus or Panasonic, like the E-PL1 or GF-1, and only the Olympus has in-body stabilization. These cameras, too, have new lens mounts, though there are more lenses available since the first m4/3 camera debuted about fifteen months ago.
I finally decided to go with the NEX-5 for several reasons. First, Sony has released an adapter that permits it to use Alpha-mount dSLR lenses. With a firmware upgrade that came out in October, that adapter will autofocus most newer lenses. Also, the new firmware made significant improvements to the NEX-5′s user interface. Of particular importance to me is the addition of programmable buttons, to which you can assign your most used functions.
Shot with the NEX-5 and the 16mm pancake lens at f8.
I was also convinced by the NEX-5 having full 1080 HD video rather than just 720. While 720 is certainly quite adequate for many applications, at this point I don’t see any reason not to go with 1080. Finally, one of the most appealing aspects of the m4/3 cameras is that there are adapters available to fit almost any camera lens out there, so you can use your Nikon, Canon or even Leica lenses. But then these sorts of adapters starting appearing for the NEX cameras, too.
I actually bought my NEX-5 at a brick-and-mortar store, Bel Air Camera in Westwood, Los Angeles, near the UCLA campus. They were offering it for the same price as everyone else (due to Sony’s pricing restrictions), and the salesman let me try it out with the new 18-200mm lens. He told me, “I don’t want to sell you that lens with that camera,” which was refreshingly honest. The reason why is because the lens is just way too big for the diminutive NEX-5, and I agreed. While it feels relatively well proportioned on a full-sized dSLR, on the NEX it really defeats the purpose of having such a compact camera.
Shot with the NEX-5 and 18-55mm lens at f8
On top of the NEX’s unique features as a compact interchangeable lens camera, I also was impressed by how much better its low-light, high-ISO performance is compared to my four-year-old a100. It’s really night and day, with the NEX rivaling the well-regarded low-light performance of the Nikon D300, which I use at work. Since I hate to use flash and like to take photos in light-challenged settings like rock clubs, I was really looking forward to getting the bump in low-light performance with the NEX.
I’ve had the camera now for just over two weeks and I’m just starting to get a feel for it. Lacking a viewfinder you compose your shot on the rear LCD, just like a point-and-shoot digicam. I don’t mind this aspect, though it does take some getting used to. The autofocus isn’t quite as fast as a dSLR, but it’s actually quieter and a little more certain than my a100, which was never known for its autofocus performance. When you want to manually focus you can magnify the center of the image on the LCD, which greatly helps nail it. In fact, I’m finding it easier to focus manually with the NEX-5 than with my dSLR. Neither is as easy to focus as my old manual film SLRs which have a split-prism viewfinder that lets you see precisely when you have focus, but those focusing screens aren’t included in any modern SLRs anymore.
Low light shot with NEX-5 at ISO 1600 and 18-55mm lens at f5.6
At first I was actually kind of disappointed with the accuracy of the autofocus, finding my pictures not quite as sharp as I’d like. Part of this I attribute to the two lenses introduced with the camera, but then I found my few manually-focused pictures came out sharper. I realized the camera came set to multipoint autofocus which seems like it averages out the focus distance between a few different points in the scene. I prefer to just have one autofocus point in the center so I know exactly where the focus will fall. I’ve since changed the setting but haven’t had a chance to go out and really test the change.
I can say that I’m very happy with the low-light performance. It truly blows away my old a100, giving me pretty clean images up to ISO 1600, and very useable images up to ISO 6400. At these higher ISOs there is noise, but it’s quite film-like and not at all unpleasing, especially given the fact that you can essentially take pictures lit by streetlight.
I did buy a Nikon lens adapter made by Fotodiox, located just north of Chicago in Waukegan, IL. With an adapter you have no autofocus, which is fine with me. You also have to set the aperture manually on the lens, but the camera still meters fine. The adapter I bought even lets you use newer G-series Nikon lenses that don’t have an aperture ring. In order to control aperture you use a little dial which opens and closes it. It doesn’t give you a precise reading, but you can see the results right on the LCD, which eliminates a lot of the guesswork. With daylight receding much earlier now I haven’t had much opportunity to take the NEX-5 out with some Nikon glass, but preliminary testing inside the house looks promising.
I’ve only shot a tiny bit of video that was worth anything, but still not with a tripod, which is really necessary if you’re going to get a steady image using such a tiny camera. The aforementioned firmware update now permits you to set the camera’s aperture manually, but only before starting to record. Frankly, that’s fine since you really shouldn’t need to change aperture while recording unless you’re doing long-form event or lecture recording. Even then, the NEX-5 really isn’t the proper tool for that job. Rather, the NEX-5 is well suited to cinema style single-camera shooting with short takes, just like all other video dSLRs.
No, there is no microphone input on the NEX-5, but its m4/3 competitors don’t have inputs either, at least not without an adapter. While I have been strong advocate of mic inputs on camcorder I ultimately decided that it wouldn’t be a big deal for me. This is because I’m quite comfortable using a separate digital audio recorder to capture audio, just like you would when shooting film. Plus, the digital audio recorder arguably will capture higher quality sound, with more precise level controls. The NEX-5 and my Zoom H2 audio recorder together take up less space in a bag than my miniDV camcorder, so this is not the inconvenience it was several years ago.
I was pleasantly surprised to find that Final Cut Express and Pro imported my video footage without any hiccups. After importing it was immediately available in the timeline for editing. I’ve only imported about ten minutes of footage so far, so I don’t know what it will be like to work with an hour or more. But so far it’s been refreshingly easy.
I will definitely need more time to get more acquainted with the NEX-5 both as a still and video camera, but so far I’m quite happy. And I’m especially satisfied with its size and the ability to slip it into a coat pocket or a small bag where taking along a dSLR would be unwieldy. I’m also interested in using it in a two-camera setup with my Sanyo Xacti VPC-CG10 palm-sized camcorder. While the Xacti doesn’t have nearly the same image quality, in good light its 720p HD video is high quality. Furthermore, the Xacti is even smaller and much cheaper, so I’ll be willing to put it places where I wouldn’t want to risk my NEX-5.
Stay tuned to mediageek for more updates about my experience with the NEX-5.
I’m always complaining about how most consumer-level camcorders don’t feature microphone inputs, or even decent mics. My Sanyo Xacti VPC-CG10 has pretty good mics for camcorder of it’s size and price. But because the mics are on the camera and there’s no input to add an external mic, they’re still inappropriate for interviews or any sort of shoot where you need to record voices clearly because the mics will be too far away.
I’m a big fan of Zoom’s portable digital audio recorders — I’ve been using the small Zoom H2 for a couple of years now. Last year Zoom released their Q3 “handy video recorder” which added a standard-definition camcorder to a high-quality stereo audio recorder. Strangely, the Q3 lacks a microphone input, although its mics outclass anything on a camcorder.
Zoom Q3HD inputs
Now Zoom has upped the ante by adding HD to create the Q3HD, featuring full 1080p HD video. I’m surprised that the Q3HD still lacks a microphone input, however it does add a line input. In its promotional literature Zoom says that the input is good for recording multiple microphones using a mixer “for sophisticated recordings.” While this is certainly useful, I question whether someone using a tiny hand-held camcorder wants to drag around a mixer and multiple mics just to get better sound. Being able to just plug in a single lavaliere mic would be much more practical.
Like most Flip-style camcorders the Q3HD has no optical zoom, and doesn’t seem to have much in the way of manual control over the video. So, in essence it’s a Flip camcorder with vastly improved audio. I think it would be vastly more useful if Zoom were to combine something like a Sanyo Xacti style camcorder, that has an optical zoom, with the enhanced audio recording of their “handy recorders.” That would really make for a DIY videographer’s dream pocket camcorder.
The Q3HD is supposed to be available by the end of the year for $299. My guess is that the street price will be a good bit lower than that. However, I’d gladly pay $300 or a bit more for my dream of an Xacti + Q3HD.
I’m a little bummed that I didn’t know about this project that happened in my Chicago neighborhood this past weekend – People’s Radio at Mess Hall:
People’s Radio will be a fully functioning radio station aimed at promoting alternative and local points of view, non-mainstream music, creating a dialogue about the “Commons”, and to demystify radio.
or, if you are in the vicinity, during the festival you can tune in at 104.7 FM
This is the culmination of two weekends of workshops conducted by members of Radios Populares. (www.radiospopulares.org) where people learned how radio works, how to build antennas, and how to set up a webstream.
I intended to get over to the Glenwood Arts Fest, but as many intentions go, it didn’t happen.
The webstream is down already and I’ll check out 104.7 FM when I get home, though I’d guess it’s no longer on the air either. I don’t know what kind of power they were using, if it was Part 15 (and therefore legal to use without a license) or higher. In any event, using a radio broadcast for short durations at events is a very effective use of the technology that mitigates many of the complications (and risks, if you’re using more than Part -15 power) associated with running regular or constant broadcasts, while also concentrating energies to demonstrate the power of broadcasting, especially when made accessible.
I hope the event was successful and might see a repeat.
Sanyo just announced a new Xacti camcorder that looks interesting due to the way it breaks from the company’s typical pistol-grip style camcorders and due to its lens. The VPC-PD2BK has a form-factor more like the Flip-style cams, but with a 3x zoom lens that looks like it came from a compact still digicam, therefore also featuring a faster maximum aperture of f/3.1 than on their pistol-grip style cams which usually start at f/3.5. Every little extra bit of light gathering helps.
As I’ve noted before, while I really like my Xacti VPC-GG10, I find that it’s lens is not up to the standard of the average digicam. In everyday use this matters less for video than for still pictures. But this better looking lens on the new PD2 gives me some hope that perhaps this cam will deliver better stills alongside full 1080p HD video (alas, only at 30 fps, rather than the cinema standard of 24p).
The PD2 also doesn’t include a mic jack or optical image stabilization–two features which would be very welcome. But at a pre-order price of $169 over at Amazon, if the quality matches or betters the VPC-CG10 (which is what I’d hope), the PD2 may still be a very appealing option for videographers looking for more flexible image control than available with the typical Flip-style cam.
Hey Sanyo, if you’re reading, how about sending me one for review? I promise to send it back ;->,
As I’ve blogged before, I’m having a blast using my Sanyo Xacti VPC-CG10 palm-sized HD camcorder. I’m starting to hear about other videographers who appreciate the CG10 not just for its cost, size and HD, but also for its manual control over exposure and focus.
I just read a quick post at the Frugal Filmmaker about writer and actor Curtis Hendley using some great DIY lighting techniques to shoot video on his CG10. Frugal FilmmakerScott Eggleston even points out the CG10′s manual controls. Also, make sure to take note of the fact that the CG10 in the photo is on a tripod, which is the best way to make sure your video comes out better and more polished.
I’m actually working on a blog post discussing how to put the Xacti camcorders’ manual controls to good use in just about any setting, and how that will make your video look just that much better than anything that comes from a Flip-style camcorder, or even a shiny new iPhone 4.
The interesting thing is that I shot this using an inexpensive “lo-fi” digital camera, the Aiptek Pencam SD. The design of this little cam is about 10 years old, shooting photos sporting all of 1.3 megapixels. There isn’t even an LCD screen to preview or review photos, just a roughly accurate optical viewfinder.
But I really enjoy shooting with the camera because of the combination of its simplicity and unpredictability. In many ways it’s a digital equivalent of a toy film camera like a Holga, frankly only less expensive. What I like shooting with such a camera is that it encourages you to let go of technical details and focus on taking the picture, often taking more risks because you can’t just review your photo and adjust.
The fact that anyone else likes the photo taken with this $19 lo-fi digital camera is just more evidence for the old adage, “the best camera is the one you have with you.”
Canon Elura, a classic miniDV cam from the early 2000s (photo credit: Capa_r2 / flickr)
When I saw the first miniDV digital camcorders in the late 1990s I was blown away by the edit-ready broadcast-quality picture they captured on tapes half the size of an 8mm videocassette and on cameras smaller than ever seen before. Yet, I couldn’t predict that only about a decade later we’d see the ability to shoot high-definition on tapeless cameras, with the ability to nearly instantaneously upload that video to the internet. In the previous ten years (roughly 1989 – 1999) we saw the evolution of the consumer camcorder from bulky shoulder-mount VHS and Beta cams to smaller, compact 8mm and Hi-8 camcorders. With Hi-8 we finally saw near-broadcast-quality video in compact cameras costing a few thousand dollars, rather than tens of thousands. That was certainly a leap, but still not as huge as what we’ve seen in the first decade of the 21st century.
Director Mike Figgis and his DV camcorder on the set of Timecode.
The ground-breaking quality and adapatibility of DV and miniDV camcorders caused many independently-minded filmmakers to use the format to shoot films that would probably have been too expensive to undertake using film. Indie films like Mike Figgis’ Timecode, Jennifer Jason Leigh’s The Anniversary Party and Richard Linklater’s Tape come to mind. All were more experimental, in some specific regard, than even most independent films of the time. And all used the small form-factor of DV camcorders, along with the low-cost of shooting multiple cameras, to do things that maximized the utility of these features.
Canon Rebel T2i
This reminiscence is sparked because this past week I had the opportunity to try out a colleague’s new HD video capable digital SLR, the new Canon Rebel T2i. The low cost and new HD quality threshold now transcended by video dSLRs are catalyzing a similar new wave of indie film and video innovation. So I was glad to finally have the opportunity to lay my hands on a video dSLR and put it through its paces, accompanied by my talented colleagues.
We tested it out in a studio with some studio lighting, using just a kit lens, to see how it would fare compared to HD video cameras that we use everyday, like the Panasonic HVX-200. The results were very impressive, arguably besting what I’ve seen with the current generation of prosumer HD camcorders used by educational and event videographers and indie filmmakers. Read more »